Important: Administrative permission is required to access the Zift123 Settings. For more information, contact your supplier point of contact.
Overview
While Zift123 can be deployed independently, integrating it with your existing infrastructure can enhance the impact and value of the total solution. To streamline integration, Zift123 has prebuilt connectors to many third-party CRMs including Salesforce, Microsoft Dynamics, Sage CRM, and SugarCRM.
What's the value in connecting your CRM to Zift123?
- Automatically sync lead information to your existing CRM.
- Pull leads with opportunities that have at least one contact.
- Save time on data entry.
- Add new Zift123 activity to synced CRM leads.
- Provide more insight to sales people for lead follow-up.
- Pull contact lists/lead lists to Zift123.
We recommend that suppliers choose a single method of lead management - email, Zift123, or CRM.
This document covers the first of a three step process for setting up the Salesforce integration. See the Salesforce Guide for all three steps.
Prerequisites
You should be familiar with the following topics before continuing:
- Zift123 Username
- Zift123 Password
- Access to Salesforce System Administrator or a user with permissions to edit user roles and object permissions for accounts, contacts, leads, opportunities, price books, and products.
- Your profile should be configured with API Enabled. If you are pulling Contact Lists as Reports, ensure that Modify All Data is also checked on the profile.

- Your Salesforce Object Permissions should be configured as shown.

Content
Take the following steps to connect your Salesforce account to Zift123:
- How to Configure Salesforce to Accept Leads from Zift123.
- How to Retrieve the API Security Token
- About Zift123 Leads in Salesforce
- How to Display a Leads List in Salesforce
How to Configure Salesforce to Accept Leads from Zift123
To send leads or contacts from Zift123 to Salesforce, you will need to set the lead source field in Salesforce to Zift123.
- Log in to Salesforce. Administrative access is required.
- Select Set up from the username menu in the upper right.
- In the left navigation, in the Build section. This example uses Leads.
- When importing Leads, select Customize > Leads > Fields.
- When importing Contacts, select Customize > Contacts > Fields.
- Click on the Lead Source field.

- In the Account/Lead Source Picklist Values section at the bottom, select New.

- Enter the value Zift123.
- Select Save.
How to Retrieve the API Security Token
- Log into Salesforce.
- Select My Settings from the drop down menu underneath the account name.
- On the left, choose Personal > Reset My Security Token.
- Select Reset Security Token.

- You will receive the security token through email. Use the token to setup the CRM Connection Settings.
About Zift123 Leads in Salesforce
- Once Auto-pull leads/contacts from CRM is enabled, Zift123 will begin importing all leads with an email address from Salesforce on a nightly basis.
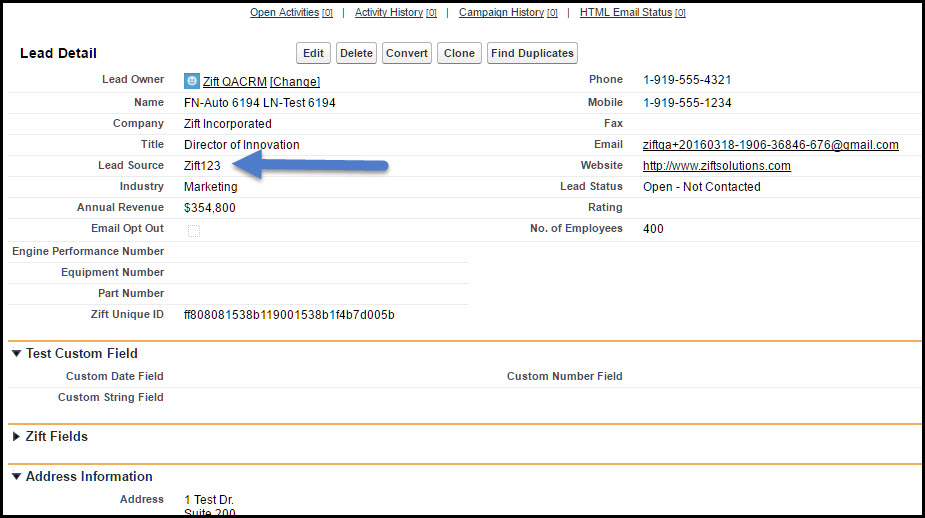
- All leads or contacts that are sent from Zift123 to Salesforce will set the lead source field to Zift123.
- Leads that exceed the lead score threshold, typically set at 50, will be sent on a nightly basis to Salesforce.
- Web click, web view, and/or email open activities will be created as contact/lead marketing events in Zift123 on a nightly basis.
- Leads will include all standard lead/contact fields such as name, address, title, email, phone number, etc.
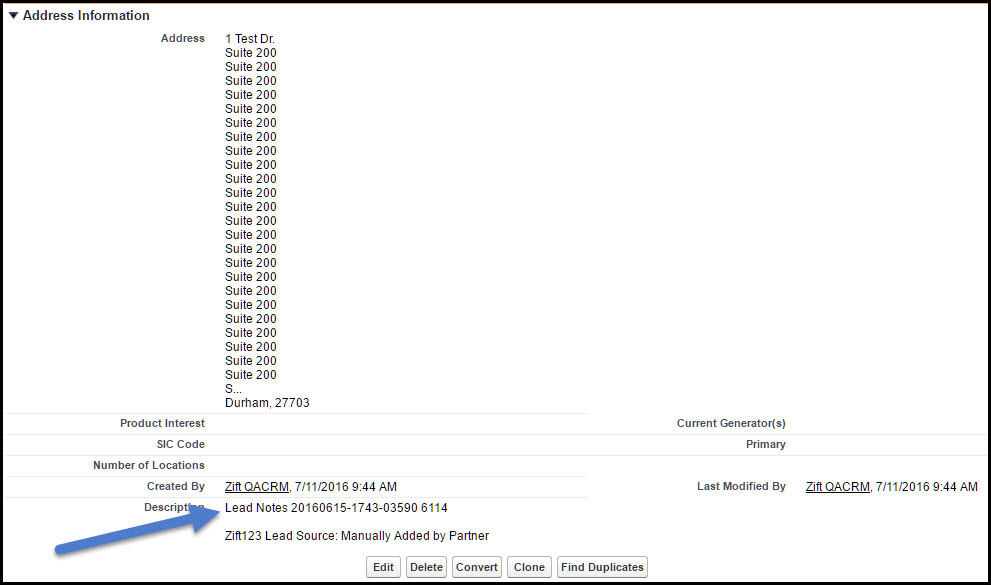
- Marketing activities from Zift123 will be on the Notes page if you have selected CRM Settings > Advanced Lead Distribution Options > Send customer fields into the Notes.
- Leads will be matched to existing Leads in Salesforce based on email address. Once a lead has been sent into Salesforce, none of the standard information will be updated or modified in any way; only new marketing activities will be added.
Here is an example of a lead in Salesforce.

Lead Notes are found under Lead Detail Address Information.

How to Display a Leads List in Salesforce
- Select Leads.
- Change the View to My Unread Leads and select filter on the bottom right.
| Continue Getting Started With Setting Up Your Settings |